· 网络与容器架构 · 约 7 分钟 · 1720 字
更新于
Nginx 核心配置指南:进程模型、Location 匹配优先级、反向代理与分级缓存
详解 Nginx Master-Worker 异步事件模型、Location 四级匹配次序、静态资源强缓存与 HTML 协商缓存划分,以及反向代理头部透传。
Nginx 是常用的边缘 Web 服务器与反向代理网关。直接拼接网上的配置片段时,容易遇到路由冲突、404 状态码变成 200 或发版后浏览器仍加载旧缓存等问题。
本文梳理 Nginx 的配置块层级、location 四级匹配顺序、分级 HTTP 缓存策略,以及反向代理与 Gzip 压缩的常用写法。
配置文件层级与 location 匹配优先级
Nginx 配置文件由四个主要嵌套上下文块(Context)组成:
main(全局配置) → events(连接事件模型) → http(HTTP 全局参数) → server(虚拟主机/域名) → location(URL 路径路由)。
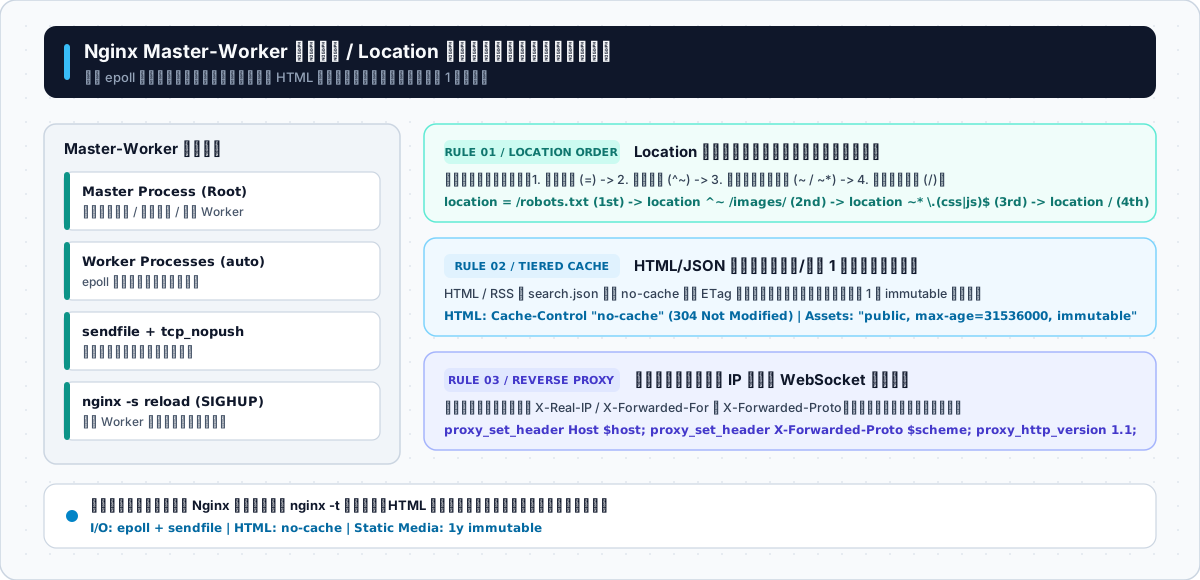 Nginx 生产网关架构:Master-Worker 进程池配合 epoll 实现高并发非阻塞 I/O,按四级优先级匹配路由,并对 HTML 与静态媒体实施分级缓存。
location 的四级匹配顺序
当一个 HTTP 请求(例如 GET /images/covers/linux-foundation.svg)进入某个 server 块时,Nginx 并非单纯按配置文件中的书写顺序从上往下匹配,而是按以下 4 个优先级依次判断:
| 优先级顺序 |
修饰符语法 |
匹配规则说明 |
常见配置示例 |
| 第 1 级(最高) |
location = /path |
精确完全匹配。命中后立即停止后续查找 |
location = /robots.txt 或 location = /atom.xml |
| 第 2 级 |
location ^~ /prefix/ |
前缀优先匹配。若该前缀是匹配到的最长前缀,则不再继续检查正则表达式 |
location ^~ /images/(匹配静态图片目录,跳过后续正则) |
| 第 3 级 |
location ~ \.(css|js)$ |
正则表达式匹配(~ 区分大小写,~* 不区分大小写)。多个正则同时满足时,按配置文件中的书写顺序采用第一个 |
location ~* \.(?:css|js|woff2|svg|webp)$(批量设置静态资源缓存头) |
| 第 4 级(兜底) |
location / |
普通前缀匹配。记录最长匹配前缀,若无正则表达式命中则使用该规则 |
location / { try_files $uri $uri/ =404; } |
静态站点路由:用 try_files 避免软 404
托管静态站点(如 Astro、Hexo、Hugo 生成的 public/ 目录)时,需要注意 try_files $uri $uri/ /404.html; 与 try_files $uri $uri/ =404; 的区别。
如果写成 try_files $uri $uri/ /404.html;,由于最后一个参数是内部 URI /404.html,Nginx 会做一次内部重定向,把 404.html 的内容返回给浏览器,但响应状态码会变成 200 OK(即软 404,Soft 404)。这会导致搜索引擎把不存在的失效链接当作正常页面收录。
静态路由与自定义 404 页面配置
1
2
3
4
5
6
7
8
9
10 | # 先查找同名文件 $uri,再查找同名目录下的 index.html ($uri/),都不存在则返回 404 状态码
location / {
try_files $uri $uri/ =404;
}
# 将 404 状态码映射为自定义 404.html 页面(响应状态码仍保持 404 Not Found)
error_page 404 /404.html;
location = /404.html {
internal;
} |
反向代理(Reverse Proxy):子域名转发与 WebSocket 透传
在同一台云服务器上,除了主域名 example.com 托管静态博客,通常还会通过子域名(如 status.example.com)运行其他 Docker 自托管服务。此时可在 Nginx 中新增一个 server 块并配置 proxy_pass:
1
2
3
4
5
6
7
8
9
10
11
12
13
14
15
16
17
18
19
20
21
22
23
24
25
26
27
28
29 | server {
listen 443 ssl;
http2 on;
server_name app.example.com;
ssl_certificate /etc/nginx/ssl/example.com/fullchain.pem;
ssl_certificate_key /etc/nginx/ssl/example.com/privkey.pem;
location / {
# 转发给宿主机回环端口或同一 Docker 网络内的容器名
proxy_pass http://127.0.0.1:8080;
proxy_http_version 1.1;
# 透传客户端真实 IP、原始域名与协议标识
proxy_set_header Host $host;
proxy_set_header X-Real-IP $remote_addr;
proxy_set_header X-Forwarded-For $proxy_add_x_forwarded_for;
proxy_set_header X-Forwarded-Proto $scheme;
# 支持 WebSocket 协议升级
proxy_set_header Upgrade $http_upgrade;
proxy_set_header Connection "upgrade";
# 连接与读写超时时间
proxy_connect_timeout 10s;
proxy_send_timeout 60s;
proxy_read_timeout 60s;
}
} |
proxy_pass 末尾斜杠的区别:
在 location /api/ 中,如果写 proxy_pass http://127.0.0.1:3000;(末尾不带 /),请求 /api/posts 会原样转发为 http://127.0.0.1:3000/api/posts;如果写 proxy_pass http://127.0.0.1:3000/;(末尾带 /),Nginx 会去掉 /api/ 前缀,转发为 http://127.0.0.1:3000/posts。
完整站点配置示例(blog.conf):压缩、分级缓存与安全响应头
将零拷贝传输、Gzip 压缩、分级浏览器缓存策略(HTML 协商缓存 + 静态资源长效缓存)以及安全响应头整合在一起,可保存为 /etc/nginx/conf.d/blog.conf:
1
2
3
4
5
6
7
8
9
10
11
12
13
14
15
16
17
18
19
20
21
22
23
24
25
26
27
28
29
30
31
32
33
34
35
36
37
38
39
40
41
42
43
44
45
46
47
48
49
50
51
52
53
54
55
56
57
58
59
60
61
62
63
64
65
66
67
68
69
70
71
72
73
74
75
76
77
78
79 | # 1. HTTP 80 端口 301 重定向至 HTTPS
server {
listen 80;
listen [::]:80;
server_name example.com www.example.com;
return 301 https://example.com$request_uri;
}
# 2. HTTPS 443 主站点服务块
server {
listen 443 ssl;
listen [::]:443 ssl;
http2 on;
server_name example.com;
root /usr/share/nginx/html;
index index.html;
charset utf-8;
server_tokens off; # 隐藏 Nginx 具体版本号
# SSL/TLS 加密配置
ssl_certificate /etc/nginx/ssl/example.com/fullchain.pem;
ssl_certificate_key /etc/nginx/ssl/example.com/privkey.pem;
ssl_protocols TLSv1.2 TLSv1.3;
ssl_prefer_server_ciphers off;
ssl_session_cache shared:SSL:10m;
ssl_session_timeout 1d;
ssl_session_tickets off;
# 零拷贝传输与 Gzip 压缩
sendfile on;
tcp_nopush on;
tcp_nodelay on;
gzip on;
gzip_vary on;
gzip_proxied any;
gzip_comp_level 5;
gzip_min_length 1024;
gzip_types text/plain text/css text/xml application/json application/javascript application/atom+xml image/svg+xml;
# 安全响应头
add_header Strict-Transport-Security "max-age=31536000; includeSubDomains" always;
add_header X-Content-Type-Options "nosniff" always;
add_header X-Frame-Options "SAMEORIGIN" always;
add_header Referrer-Policy "strict-origin-when-cross-origin" always;
# 分层缓存策略 1:HTML、RSS 订阅源与搜索索引每次执行 ETag 协商校验
location ~* \.(?:html|xml|json)$ {
add_header Cache-Control "no-cache, must-revalidate" always;
add_header X-Content-Type-Options "nosniff" always;
try_files $uri $uri/ =404;
}
# 分层缓存策略 2:图片、字体、CSS 与 JS 资源启用 30 天缓存
location ~* \.(?:css|js|svg|webp|png|jpg|jpeg|gif|ico|woff2)$ {
expires 30d;
add_header Cache-Control "public, max-age=2592000, immutable" always;
add_header X-Content-Type-Options "nosniff" always;
access_log off;
try_files $uri =404;
}
# 屏蔽以点开头的隐藏文件(如 .git / .env)
location ~ /\.(?!well-known) {
deny all;
access_log off;
log_not_found off;
}
# 主路由与 404 错误页映射
location / {
try_files $uri $uri/ =404;
}
error_page 404 /404.html;
location = /404.html {
internal;
}
} |
配置校验与重载命令
修改完配置文件后,按“先检查语法、再热重载、最后用 curl -I 核对响应头”的顺序验证:
1
2
3
4
5
6
7
8
9
10 | # 1. 验证 Nginx 语法并查看合并后的配置
sudo nginx -t
sudo nginx -T | head -n 40
# 2. 平滑重载配置(不中断现有连接)
sudo nginx -s reload
# 3. 核验正常页面返回 200 OK,不存在页面返回 404 Not Found
curl -fsSI https://example.com/
curl -i https://example.com/non-existent-page-check | head -n 15 |